Home Galley

Follow my kitchen experiments, catastrophes and triumphs


Leave a comment

The world’s best home made mince pies

Summer Christmas for us in New Zealand! The weather has been lovely, although a summer Christmas still seems SO wrong. However, I’m not going to allow the thermometer to dictate my festive foods. My brother has come out for a visit with his family, so we have a great reason to cook up a storm. They’ve been here two days and so far we’ve baked Gingerbread Christmas stars for the kids to decorate, easy banana muffins, eaten a lot of my traditional Christmas cake and some mince pies. Actually, rather a lot of mince pies. And they are amazing! This is not an exaggeration. My brother, who is a mince pie connoisseur, has rated these as the best ever. Considering he’s had our Gran’s incredibly yummy ones, and some also seriously posh British ones (from whence these originate), he is well placed to judge.

Some people like flaky mince pie pastry cases (eeurgh) and the people with really good taste prefer a good, short, crumbly sweet shortcrust. I’m sure you can tell which camp I fall into.

The filling I made using a recipe, highly recommended by a friend, from stuff.co.nz and includes figs, ginger and chocolate. Good mix. Great mix actually. I’m never making plain sultana mince ever again. Ideally you want to make this a couple of months before making the mince pies. For the pastry I combined a couple of recipes to make a short sweet pastry that I liked. I baked mine in small catering foil pastry cases because they help my pastry cases get nice and crisp. However, you can use a muffin tin for small muffins, simply don’t use the full height of the muffin holes. Christmas Mince Pies

The Fig, Ginger and Chocolate Mince Filling

Ingredients:

3 cups packed dried figs
1 cup sultanas
1/4 cup crystallised ginger
150g dark chocolate
1 apple, peeled and grated
3/4 cup brown sugar
1 cup brandy

Method:

Chuck everything apart from the brandy and sugar into your food processor and roughly chop. Mix through the sugar and brandy.

Cover and leave in a cool place for two days, stirring occasionally.

Pack into two large sterilised jars and seal well. Leave to mature for at least 1 month before using.

Sweet shortcrust pastry (for approx 36 pies)

Ingredients:

450g cold butter cut into cubes
700g plain flour
200g golden caster sugar
1 jar of your mince meat
2 small eggs
around 4 tablespoons of cold water

Method:

Cut the butter into the flour. Try and use a pastry cutter if you can to keep the butter from melting. If you don’t have one, use a sturdy fork, or rub it in with your hands. Once the butter and flour mix resembles fine bread crumbs, stir in the sugar. Using a spoon, quickly stir through the eggs, and use a teeny amount of water to bind the pastry dough together. You are looking for a fairly dry and crumbly mix that only just holds itself together. I used 4 tablespoons of water today, but this can vary. Add a tablespoon at a time and see how you go. If you add too much, the dough will get sticky and be useless.

Wrap in clingfilm and chill for 30 minutes.

Pre-heat your oven to 180 degrees C (fan). Roll the pastry out to approximately 3mm thickness. You want the pastry to be quite thin if you can manage it. Cut rounds slightly bigger than your  muffin tin openings so that you can form the base and sides of the pastry bases. Fill these 2/3rds full with your mincemeat. Cut a smaller round or a shape to top off the pie. If you use a solid circle for the topping, don’t forget to poke a cross with a knife to let the steam out. Bake for 25-30 minutes.

Once cooled on a cooling rack, top with sprinkled icing sugar.

If you want to freeze these, do so before baking them.


6 Comments

Delicious Coconut Lime Chicken

While those of you stuck in the northern hemisphere are preparing all sorts of comforting, warming treats for your cold Christmas season, those of us down south are sweltering and on the hunt for light and refreshing meals. I am absolutely missing the cold and misery and snow that makes Christmas so wonderful. A hot and summery Christmas just seems so wrong somehow, even though I spent 26 years growing up in South Africa with hot Christmas days. My six years in the UK taught me one thing. Christmas is MADE for cold weather! All those lovely warm wintery spices…..yummy! They just don’t work quite as well in summer. And while I’m resigning myself to a truly lovely Christmas day spent having a fresh fish barbecue on the beach, my heart will really be with friends and family thousands of miles north and 12+ hours behind us, enjoying a truly festive meal. Enjoy it everyone, I will be wishing I could join you all!

But back to the truly dreadful weather down here in Auckland. Its been an absolutely perfect 21-24 degrees with nary a drop of rain ALL week. Its been quite depressing stuck in the office on these perfect days, but thankfully the weekend is here again. I will be making an excuse to work a few days a week from our office on the north shore over the next few weeks, just so that I can enjoy the sea view and lunchtime beach runs on offer there. I feel like a total slob when I work there. Virtually all of my colleagues based in the enviable beach office run/walk/cycle or kayak in to work. Then they all go for a lunchtime run, followed by a 500m swim out to the bouy in the bay and back again. Then its a race up the two flights of stairs to nab the shower with the best water pressure and back to the grindstone. What an awful place to work. I don’t know how I cope at times!

Needless to say, such exertions require some calories, and one of my favourite summertime dinners is this sublime coconut and lime chicken. Its essentially a mild thai curry and really delicious. You can add loads of veggies, and serve on rice, couscous or quinoa. It works particularly well with sweet peppers or brocolli. You can use chicken breast, but this is absolutely heavenly (and unfortunately marginally less fabulous for the waistline) made with boneless, skinless chicken thighs. I searched Pinterest (as you do) for the perfect recipe, and although I kept finding some fabulous PHOTOS of this dish, nobody seemed to have the smarts to post a link to the actual blog! Much searching later, I found the original coconut lime chicken recipe, and what a fabulous recipe it is too. Don’t read the My Kitchen Escapades Blog too much, because you’ll never leave your kitchen, her recipes are amazing! 😉

Coconut Lime chickenIf you have the time, leave this to marinade overnight and take the time to really reduce the sauce by simmering gently until you get a lovely thick, oozy curry sauce. That said, its also delicious with an hour of marinading and is ready to eat before your rice has a chance of cooking.

Ingredients (To serve 2 adults and 2 smallish kids):

  • 8-10 skinless, boneless chicken thighs
  • 1 standard tin of coconut milk
  • 2 limes
  • 1 and half teaspoons of ground coriander
  • 2 tablespoons reduced salt soy sauce
  • 2 Tablespoons brown sugar
  • 2 tablespoons mild curry powder (I use garam masala)
  • A pinch of smoked paprika
  • 1 red chili, chopped
  • a big handful of fresh coriander leaves (cilantro for those of you in the USofA)
  • Chopped/sliced veggies of choice.

Method:

  1. Chop the chicken thighs into 3 or 4 pieces each
  2. In a large Tupperware with a tight sealing lid mix the coconut milk, the zest and juice from one of the limes, the coriander, soy sauce, sugar, curry, paprika and chili
  3. Add the chicken pieces, seal the Tupperware and give it a good shake. Leave for anything from an hour to a day IN THE FRIDGE, shaking when you can. The longer this marinades, the better, although obviously don’t leave it so long that it goes all dodgy. Don’t be like a friend who left this on the counter all day on a 35 degree C day (that’s like 98 in F I think). She wondered why it smelt a bit dodgy afterwards. Hmmmm.
  4. When you’re starting to get hungry, get your rice on the go, oil and heat up your grill pan to medium. Drain the chicken pieces, retaining the coconut sauce.
  5. Grill those chicken pieces, adding the veggies when they’re virtually done. Saute the veggies for a minute, then add the coconut sauce to the grill pan and simmer until the sauce thickens up a bit. Season to taste.
  6. To serve, spoon over the rice, and THE most important part, squeeze over some fresh lime juice from the remaining lime and add lots and lots of fresh coriander leaves. Sublime. Best enjoyed al fresco with some chilled white wine.

Just a note here, you can add as much or as little chili as you like. I leave it out entirely for some people who don’t like spicy food and add loads extra when serving for my hubby who enjoys his “Thai Hot!”


2 Comments

This year’s Christmas Cake

Its been a ridiculously long time since my last post. We’ve had a fabulous ski trip and moved to the other side of the world. Its taken us a while to settle down here. We’ve had to move into our rental, await the arrival of our shipping container, find a job each, settle the kids into child care and start house hunting. I can’t believe that we have been here for over 8 months!!!! This year has flown, and Christmas is only 2 months away….eeek!

I have been baking and cooking but struggling to find the time to upload blog posts and photos. Hopefully I can get back into it now.

Tonight I am making my annual Christmas cake. Over a month late!!! I can only hope that 6 weeks is enough time to mature it properly. I’m sure an extra application of brandy will assist the process.

image

I’ve been baking some of Gran’s crunchies every week for the kids snacks. I also experimented with some condensed milk lemon biscuits.

Shopping here in New Zealand is interesting and very different to the UK. There is a LOT less choice. But what there is seems to be better quality, as long as you stick to seasonal produce, which I generally do. Good fresh fish is easy to find. And I am growing broccoli,  leeks, strawberries, tomatoes and loads of herbs in my little rental veggie garden.

We cannot wait until we move. We have bought a gorgeous house with a paddock and a big garden.  I’m planning some fruit trees for my birthday and Christmas present and a big vegetable garden. Tree-wise we are planning a lemon, lime, grapefruit, manderin, plum, peach, nectarine, apple, pear, loquat, kiwi and cherry. That should be enough to keep me busy. We will also finally get some chooks. Fresh eggs, hooray!!!! And a friend will put a bee hive in our paddock, so we will get home grown honey! We’ve also got enough space to raise a couple of lambs for the freezer every year. Or possibly a pig. Yum!

What plans do you all have lined up for Christmas? My brother and family is coming to visit from Australia for 2 weeks. I can’t wait. We’re going to do a roast on the bbq and go down to the beach.


2 Comments

Ooo delicious chocolate pie!

WOW, I haven’t managed a blog post in absolute ages and ages! Life has been incredibly busy though, so I have an excuse. Since my last update a few (several) months ago *blush* I’ve packed up my entire house into a shipping container and sent it off halfway around the world, spent a lovely last week in Europe skiing, said farewell to London, flown halfway around the world with two small children, moved into our rental house with the bare minimum of borrowed camping gear,  unpacked the shipping container on its arrival, searched for and found a fabulous job, settled the kids into a lovely nursery school and started working…fulltime! So as you can see, I have good reasons for my recent silence. However, I’ve managed to scrape some time out of my busy schedule for a blog post.

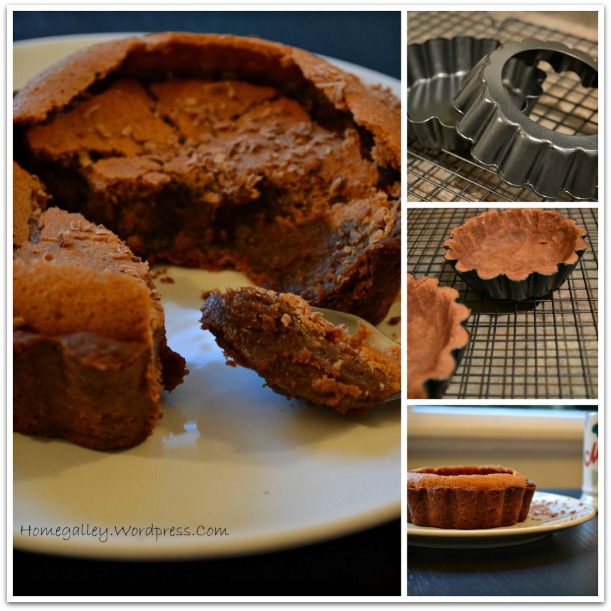
Before I left the UK, my lovely chefy friend over at Colour Me Happy Kitchen very sneakily gave me some house warming spending money. Naturally I HAVE to spend this on kitchen goodies. So far I’ve bought a much needed non stick cooling rack. An extra large one! 🙂 its big enough to cool 2 of my large Christmas cakes at once. Or a super large batch of cookies. I also treated myself to some teeny weeny pastry tins, with removable bottoms. They are too cute, about 15cm in diameter. Check them out in the photos. And they worked perfectly for this chocolate pie.

There is currently a delicious tv show in New Zealand called the Hottest Home Baker. All of the dishes are amazing, and far beyond my skills. My workplace also has an annual competition at the time the show runs for the Stormwater Hottest Home Baker (yup, I work in stormwater engineering). I have no idea what the competition is like, but I’m told it varies wildly from incredible tasting to not so tasty but highly decorated and creative cakes. Apparently my boss even gets in on the act! Last year he created a bunt cake filled with blue jelly (jello) and modelled edible swimmers. Crikey! I’ve decided to go for the So-Incredibly-Delicious-It-Doesn’t-Need-To-Be-Pretty approach with my reliable standby,  Death by Chocolate Pie. The original version of my pie, while delicious, is cheap and nasty, and evolved during my student days. I’ve decided to pimp it up with some slightly more sophisticated ingredients (eggs, real butter, expensive chocolate and hand made chocolate pastry) and a subtle hint of coffee. I am spectacularly happy with the results.

Unfortunately I am still getting the hang of my new oven (and its a horrid one) so will be buying an oven thermometer to help me out. I guess I’ve been spoilt with top notch ovens for the last 4 years. This oven seems to have a massive draft that makes the temperature fluctuate wildly, even when I don’t open the door, very strange. In this case though, I ended up with a perfect, uneven bake, which was lovely. A crisp meringue textured crust and an oozy, fudgey delight inside. My pastry was slightly overdone, but I blame that entirely on my hot hands. My hot hands tip is to stick your hands in an ice water bath before handling your pastry dough and to work quickly with the minimum handling of the dough.

You definitely want to try and eat this slightly warm, but its still very yummy cold the next day, if it lasts that long. And unfortunately, my little girl has a nasty tummy bug today, so I had to stay home with her. Which means I can’t enter the competition. Ah well, can’t let all that pie go to waste! 😉

Chocolate pie

Ingredients (for three itty bitty pies, double the ingredients for one very big pie):

Pastry:

115g plain flour

15g cocoa powder

75g cold butter cut into small pieces

15g caster sugar

around 3 tablespoons of cold water

baking beans or rice

Filling:

85g butter

175g dark sticky sugar (or substitute with light brown sugar, but replace a tablespoon of the sugar with strap molasses or treacle)

2 beaten eggs

2 tablespoons of sieved cocoa powder

75g of good quality dark chocolate (I use Lindt 70%)

150ml single cream

1 tablespoon of black coffee

Method:

Pastry:

Sieve together the flour and cocoa powder twice until well blended. Cut or rub the cold butter into the flour mix until it resembles fine bread crumbs. Stir in the sugar. Very carefully add your cold water bit by bit until you have a soft dough. You will need less water than you think, it needs to be just the damp side of crumbly. Stick the dough in the fridge for roughly 20 minutes to chill. While you’re waiting, grease those pastry tins, and make sure your oven is preheated to 190˚C or 370˚F.

Cut the dough into 3 equal portions, and press into your pie tins. You want to try get the pastry as thin and neat as possible. Remember, it will shrink, so its ok if it sticks out a little at the edges. Line with tinfoil and fill with baking beans or rice. Bake blind for 15 minutes, remove the baking beans and tinfoil and bake for another 10 minutes.

Filling:

Start melting the chocolate in a bain marie. While its melting, cream the butter and sugar. Once light and fluffy, gradually add the eggs and cocoa powder, alternating between the two. Add the melted chocolate, the coffee and the cream and beat till blended. Pour into your pastry cases and bake at 170˚C or 340˚F for 40 minutes. Dust with cocoa powder or icing sugar if you like. This is great warm and oozy with a side of good quality vanilla ice cream. Enjoy!


Leave a comment

Simple Berry Muffins

I’m frantically in the process of emptying my pantry and fridge. I seem to have an incredible 13 varieties of flour, six types of sugar, three types of icing sugar and various other baking and cooking items that we cannot stick in a shipping container for three months. Please don’t tell my long suffering spouse about the 13 types of flour! He WILL kill me. I also have 2kg of mixed berries in the freezer. And less than 2 weeks to use them up! The toddler and I have just used some (not enough) of them up in some plain berry muffins. You can add white chocolate chips, and replace the oat milk with the ordinary kind. If you do that, you will probably need a tablespoon or so less milk.

Berry MuffinsIngredients (for 12 muffins):

275g self raising flour

1 teaspoon baking powder

220g light brown sugar

130ml vegetable oil

150ml oat milk (or 130ml ordinary milk)

1 teaspoon vanilla extract

300g of berries

(Optional) a tablespoon each of demerara sugar and oat bran

Method (This is the EASIEST method ever):

Preheat your oven to 180 degrees C

Mix your dry ingredients together.

Mix the wet ingredients together and add them to the dry along with the berries.

Mix until JUST combined, you can add a splash more milk if it feels too dry and thick.

Divide evenly into 12 large muffin cases, sprinkle with your sugar/oatbran mix and bake for 30-35 minutes.

Toddler and I enjoyed these straight out the oven snuggled on the couch under a blanket! There is still snow on our lawn!


4 Comments

Honey and mustard chicken with tarragon

WOW, over a month since my last post!!! Huge apologies everyone. To be honest, I’ve been struggling to find the time to even cook, never mind photograph my meals and write about them.

Our household has been incredibly busy and topsy-turvy this last month. Just before Christmas, our visa for New Zealand was approved and we decided to pack up and go as quickly as was humanely possible. We are off in less than a month now, and still need to clean all our camping gear, road bikes, hiking boots, get rid of clutter and prepare the house for the packers who arrive in just 2 weeks today…AARRGGHHHH!!!! After that, we are heading over to France on a road trip to visit friends and enjoy a last week of European skiing. I can’t wait. I’m absolutely rubbish at skiing, but I enjoy every second of it. Fortunately after years of face plants onto tarmac while wearing skates in my youth and from the back of a horse over jumps (onto grass luckily) I have a disturbing lack of fear of falling onto snow or ice, which probably helps a little.

My most exciting kitchen news was that…………………..(no, sorry no Kitchen Aid stand mixer, yet)……………….I finally finally got a couple of Le Creuset enamelled cast iron pots. My beloved deep, slope sided frying pan (its not really a wok) finally gave up the ghost after 6 years of loyal, almost daily use. It wasn’t the fanciest pan to begin with and has been heavily abused by me and a number of house guests over the years. I decided to replace it with something a little more exciting (and pretty) and persuaded my long suffering spouse that I want NEED cast iron of the enamelled kind. He nearly baulked at the price, but I was very persuasive. I am now the proud owner of a Le Creuset large shallow casserole, and large oval deep casserole pot. Needless to say I spent many days in discussion with my trusted chefy friend L making my selection.

SnowTo christen the shallow casserole, to provide some comfort from the recent snow, and as a stress relief from all the packing I made some roasted honey and mustard chicken pieces with tarragon. The tarragon is optional, but I like how just a little breaks the honey mustard taste a little. I added some veg to mine, and we ate it served with rice. It will work just as well with mashed potato, or couscous though. You can use smooth mustard of any variety (I recommend against the radioactive yellow American style hotdog mustard though, sorry USA bloggers), but whole grain is fabulous. If you are in the UK, DO try this with Tracklement’s Beer Mustard. You will love me (and them) forever.

Honey Mustard ChickenIngredients (serves 2 adults and 2 hungry kids):

One onion, finely chopped

6 crushed/chopped garlic cloves

A large heaped tablespoon of whole grain mustard.

Two tablespoons of runny honey

4-6 chicken leg/thigh pieces, skin and bone intact

2 cups of assorted chopped veg (I used diced carrot and courgette)

Pinch of dried tarragon (or a teaspoon of finely chopped fresh will be great)

Half cup of boiling water.

Method:

Preheat your oven to 160 degrees C

Saute the onion in an oven proof pot, before covering and leaving to sweat gently for 10 minutes until soft.

While the onion is sweating, mix the honey, mustard and tarragon together, and use it to coat the chicken pieces.

Add the garlic to the onion and lightly cook a little more.

Remove the onion/garlic from the pan, turn up the heat and brown those chicken pieces. They don’t need much because you will be using the oven to crisp them up later.

Return the onion and garlic to the pan, add your veg and boiling water.

Put the lid tightly onto the pot, and place in the oven and cook slowly for an hour.

Remove the lid, turn the chicken pieces so they are all skin side up and cook for a further 15 minutes in the oven so that the chicken skin can brown up. This is really easy thanks to the sugar in the honey.

The chicken meat should be moist and tender thanks to the hour of slow steaming in the lidded pot, and you still get the crisp skin, double bonus!

Enjoy served with whatever you like.


1 Comment

Fake Pesto = Popeye Pasta sauce for kids

I love a fresh basil pesto pasta. But basil pesto sort of sucks without the parmesan cheese if you’re dairy free like me. And then, much as I know basil is rammed full of healthy goodness, I’m always quite keen to add a few more veggies into anything I serve up to my kids. Plus some kids seem to hate the taste of basil, unfortunate little souls, and this is a good way to introduce the taste a little more gently. Enter fake pesto sauce. I whipped this up in mere minutes and the kids wolfed it down even more quickly.

I keep vast quantities of this frozen in little cubes in my freezer as a quick pasta sauce for my kids. Its pretty versatile and works brilliantly if you half and half it with a béchamel sauce, stir through some scrummy cheese and shredded chicken or tuna. You can even use it for a pasta bake. Or as a puree for a really small baby, or as a base for a pasta sauce for adults.

Green pasta sauceIngredients:

1/2 a finely chopped onion

A couple of cloves of crushed garlic

2 medium courgette, grated

A large handful fresh spinach (or a few cubes of the chopped frozen variety)

A big sprig of fresh basil leaves (optional if your kids can’t stand it)

Method:

Sweat the onion in a little olive oil in a covered pan until very soft and full of flavour. Add the garlic and saute for a minute. Add the green veg and  cook gently until everything is well softened before blitzing with an immersion blender, liquidiser or food processor.

To freeze, portion out into ice cube trays, cover till cool, then freeze. Once these guys are frozen solid, you can flip them out of the tray into a ziplock bag. They will keep for roughly 3 months in the freezer.


4 Comments

Apricot and Almond Tart

Some of you may have noticed my absence from blogging over the last month or so. Life has suddenly become very busy; we have an impending emigration looming, so I’ve been busy sorting, decluttering and partially packing things. Its very stressful and exciting at the same time, but isn’t leaving me much room for cooking anything decent. We’ve been relying on an embarrassing number of take out meals. Both sad, and boring!

As an added bonus, it has been absolutely freezing cold here. Last week we had a sprinkling of snow, just enough to disrupt everything. And today, at a chilly -4 degrees C, everything is frozen and covered in frost. It looks fairyland beautiful, but is definitely a day for perking myself up with a reminder that summer will be back, eventually.

My chefy friend L over at Colour Me Happy Kitchen, who did some epic jam making with me earlier in the year, came up with the MOST delicious Apricot Almond sunshine tart that just sings of sunshine! Her version is gluten AND dairy free, whereas mine is just dairy free. You could switch out the dairy free spread for butter if you are a butter only cooking snob, but honestly, this tart is delicious and light as is, so you really don’t need to.

This was very simple to make. We had this a few weeks ago as a dessert for a dinner party and while I was putting my kids to bed, my sneaky guests dished it up and gobbled it down so quickly that I didn’t get a chance to take any photos of it ready to eat. They were however, nice enough to leave me the barest sliver to eat. Thanks guys!

Apricot Almond TartAdapted from Colour Me Happy Kitchen’s All-in-one Apricot and Almond Sunshine Tart:

Ingredients:

75g dairy-free sunflower spread

100g caster sugar

1 tsp vanilla extract

2 beaten eggs

30g plain flour

75g ground almonds

a tin of halved apricots

Method:

Preheat your oven to 180 degrees C

Grease an 18cm cake tin with a loose bottom (I used a silicone tart case)

Mix the sugar and sunflower spread together in a bowl until well combined. Add the vanilla extract.

Beat in one egg till well combined, then add the other egg and beat till combined. Gently stir in the flour and ground almonds before spreading over the base of your cake tin. The dough is quite thick and you don’t need to worry about spreading it all the way to the edge.

Drain the tinned apricots and place them evenly all over the mix, rounded side up, without pressing them in.

Bake for about 25 minutes until the almond mixture has risen up around the apricots and turned golden brown. Let your tart cool in the tin for a few minutes before loosening with a knife and lifting out of the tin. You can cool it on a wire rack or on the tin base, but my dinner guests ate it pretty much straight out of the oven.

This goes brilliantly with a dollop of pouring cream or ice cream, but I enjoyed it on its own. A delicious shot of sunshine to brighten up a frosty winter day!


4 Comments

Fornightly Meal Challenge #4: Sloe Gin Venison Pie

I absolutely love the warm, comforting deliciousness of a decent meat pie on a cold, damp night. On a particularly blustery night, I put together a very special venison pie for one of our holiday dinners. The special ingredient? Sloe Gin! If you don’t know how to make it, check out my handy recipe, so you’re all prepared next year! If you don’t have sloe gin and are desperate for venison pie, never fear, this works very well with lashings of red wine instead.

I’ve found loads of venison pie recipes. I’ve also read that once your sloe gin is ready, the sloes left after decanting go well with venison pie. I’ve never managed to find a recipe for the two together, so decided to try making my own.

The only hot tip when making venison pie is that you must NOT under any circumstances braise/brown the venison. It can make the meat tough and even 12 hours of slow cooking won’t save it. You’ve been warned. To get super melt in the mouth meat, you slow cook this stuff slowly in the sauce. The best method I’ve found is 12 hours in the slow cooker, finished off with an hour in the oven to add some colour before adding that lovely puff pastry topping. My MIL does hers (with kudu and mushrooms) all day in a pressure cooker and it is gorgeous.

While we were away I didn’t have a slow cooker or a pressure cooker, so did mine for 8 hours in the oven before adding the pastry. The meat was just as tender, but slightly drier. Clearly slow cooking does keep meat tender and moist. 
I cheated and used ready rolled puff pastry because I’m absolutely rubbish at pastry. I blame my hot hands. You can use any veg but this works best with winter seasonal root veg like carrots, parsnips and Swede. Mushrooms will also work well, but you should probably cook them in butter before adding them.

For the venison, try to get hold of cheap diced meat. The lower legs are fantastic for flavour and the long, gentle cooking really breaks the meat down into meltingly tender and rich tasting pie. This is one of those dishes where it pays to be friendly with your local butcher.

Don’t like pastry? No problem, you can just serve this as a casserole with a root veg and potato mash, dumplings or rice.

Ingredients (for 8 hungry hunters):

800g diced venison off the bone

2 large white onions, chopped

A tablespoon of chopped fresh garlic

Olive oil

A small glass of sloe gin (roughly 125ml)

2 cups (tins/cartons) of chopped tomatoes

2 bay leaves

large sprig of fresh rosemary

large spring of fresh thyme

A good quality beef or vegetable stock cube

Assorted veg, just use what you have. I had six carrots, four parsnips and a couple of courgettes

250g ready rolled puff pastry, or make your own!

A beaten egg or a couple of tablespoons of milk to wash the pastry

Method:

Preheat your oven to 120 degrees C.

Coat the base of a large pan with olive oil and put onto a medium heat.

Saute the chopped onion then cover the pan and turn down the heat to let them sweat until translucent. It should take about 10 minutes. Give the pan a shake now and then so they don’t stick and burn.

Add the garlic and turn up the heat again for one minute. Add the sloe gin and sauté off the onions and garlic for a few more minutes until the sloe gin fumes stop giving off their alcohol fumes.

Add the chopped tomatoes and bring up to a simmer. Add all the other ingredients, top up with some boiling water if necessary (you want everything to be just covered with sauce) and transfer to a covered oven proof dish and pop in the oven. You may need to fiddle with the oven temperature, but you’re looking for this to have a gentle fizzle of bubbles at the edges so that it cooks really slowly. I did mine for eight hours, stirring once after four hours. Remove the lid for the last hour so that it can get some extra colour.

Roll open your ready rolled pastry, or roll out your own. Cut to fit your pie dish. I usually use a new dish so that I can measure the pastry nicely, and to ensure I dirty up some extra dishes for my long-suffering spouse to wash. Remove the venison and turn the oven up to 200 degrees C.

Transfer the venison filling to the pie dish. You shouldn’t need to thicken it up, but you could do with cornflour if you really want. Brush the rim of the dish with your egg/milk to glue the pastry lid down. Top with pastry, embellish as desired, poke in a few holes to let out the steam and brush all over with egg/milk. Pop it back in the oven at 200 for 40 minutes.

Serve and enjoy! You can serve it with boiled new potatoes tossed in butter and parsley with some fresh steamed beans or broccoli, but as you can see, we didn’t bother and enjoyed it just on its own.

What are your favourite meat pie fillings?


2 Comments

Easy Easy Rosemary Pull-Apart Bread

Nothing knocks the socks off dinner guests like home made bread. The wonderful taste of fresh bread is just so much scrummier than anything from a shop. Add to that the “straight out the oven” warmth and you’re onto a winner. An added bonus, as well as wowing your guests, most bread is actually ridiculously easy to make

This bread is one of those super easy types and will impress even your most severe critics. I even got it right in an oven not my own,  always a risk when baking. Its also pretty adaptable. You can mix and match your flours, although don’t go more than 50% wholewheat or you may end up with a brick rather than a loaf. You could replace the rosemary with caramalised onions or thyme and grated parmasan, drool! You can bake this as a standard 2lb loaf, solo rolls, plaited loaf, the options are endless. The olive oil adds flavour and moistness as well as helping the loaf to last a little longer. Good luck with that though, mine lasted all of 30 minutes, followed by requests for, “More please!” and that is no exaggeration.

Using just seven ingredients, and a fair amount of hands off time,  I’ll explain how to make this so that you can still go out for the day and have it ready to pop in the oven for dinner.

Ingredients:
600g bread flour. I used a mix of half strong white bread flour and half a whole wheat malted seed flour. You can use whatever mix takes your fancy,  as long as roughly half is strong and white.
1 sachet of dried yeast (roughly 7g or a rounded teaspoon)
1 rounded tablespoon sugar (or honey)
A large pinch of salt (also have a course salt grinder on hand)
A tablespoon of fresh rosemary leaves chopped (dried is also fine)
Olive oil
380ml of warm water (about a cup and a half)

Method:
First thing in the morning, put the flour and salt into a large bowl. Make a well and tip in the sugar and yeast. Add the water and start drawing the flour into the center. At first it will seem like you don’t have enough water and then,  you may end up with what seems like a just too wet dough as it all comes together. Add more water or flour right at this beginning stage until you get one ball of dough that’s slightly sticky.

Knead for a good 10 minutes to develop the gluten. There are some great videos on You Tube for kneading techniques for slightly wetter bread dough. Don’t be tempted to add more flour unless it’s really not holding its shape. The dough will lose its stickiness as the gluten develops.
Once the dough starts feeling nice and elastic,  do the window pane test to check that it stretches thin rather than tears. If you’re happy with the gluten development,  form it into a ball and leave to rest on the counter.

Scrape any chunky bits out of the original mixing bowl (it must be a large bowl with room for the dough to more than double in size. Add a swirl of olive oil to the bowl and make sure it coats the base and sides. Add in your dough and flip it over once or twice so it’s all coated in olive oil. Cover with oiled cling film and pop into the fridge. Go to work, or the beach in our case.

When you get home in the early evening,  take the bowl out of the fridge and leave somewhere to come to room temperature. I did this while I fed the kids. An hour later,  get the dough out of the bowl,  it should have more than doubled in size after 8 hours in the fridge. Gently flatten it on the counter. It may feel pretty rubbery if still cold,  that’s just fine. Sprinkle the surface with rosemary and coarsely ground salt. Fold into thirds. Flatten gently and repeat twice more. Form into a sausage shape and cut into 9-11 equal pieces.

Shape each piece into a roll. There is a great video here on You Tube to show one way to do it. Place each of the rolls into a pre-greased, 28cm round cake tin. Once all the rolls have been crammed into the tin,  sprinkle on some more rosemary and sea salt before gently covering with some oiled cling film and placing in a warm spot to prove. An hour and a half should do it. Get those kids bathed and into bed.

Heat your oven as hot as it will go (260 for mine) and place an empty baking tray on the bottom rack. If you have a baking stone,  pop that on the middle shelf. If you don’t,  a Pyrex dish sans lid that will fit the cake tin will also work well. I did mine with neither and it turned out just fine. Boil your kettle.

Once the oven is nice and hot you need to do two things really quickly before GENTLY closing the oven door again. 1) pour the kettle full of water into that nice hot baking tray on the bottom shelf (be warned it will be very steamy) and 2) slide your bread in its cake tin gently onto the middle shelf. Close that door gently. Turn the oven temperature right down to 180. Bake for 30 minutes. Do NOT open the door.

After 30 minutes,  take out the bread,  turn straight out onto a rack and leave to steam while you get your soup poured into bowls etc.

Serve on a chunky wooden board and pull apart to get your piece. Delicious with a thick smear of butter or with soup. Enjoy! !!